First the good news.
There are two peppy little meat-breed chicks bopping around the brooder these days.
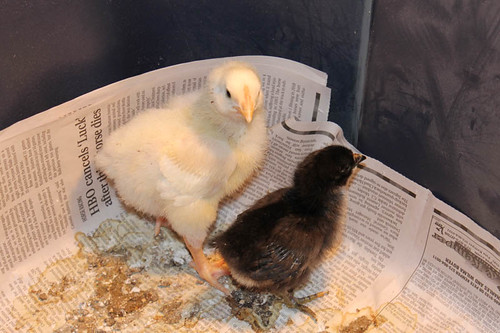
No, that big guy isn’t one of our own. He’s a Cornish Cross that we got to compare growth rates to.
Now that little black fella, that’s one of ours.
And the bad news? Dang, I was hoping you’d forgotten about that.
Unfortunately, only two chicks hatched on my incubators maiden voyage. Two out of around 50 eggs. Not good. That kind of abysmal hatch rate is indicative of a big incubator problem.
So I recently got the incubator back to my house where I could tear it all apart and overhaul the thing.
Here’s a photo of incubator v1.0.
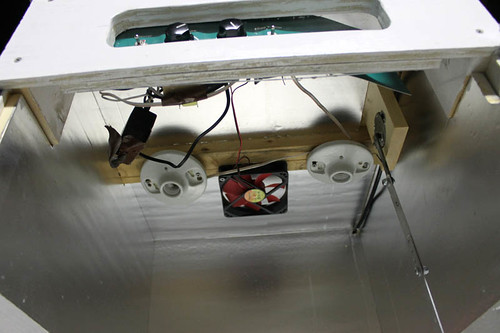
Here’s what you’re looking at:
- The heat source(s) are two 90watt rough service light bulbs that screw into the ceramic sockets there at the top.
- The fan is a 4.5″ 12v fan that’s supposedly good for 73cfm of air movement.
- The metal bar hanging down at the right is the arm for the egg turner.
- That mess of wires just barely visible at the top is where the thermostat is. The thermostat was a mechanical wafer-style job, much like this one.
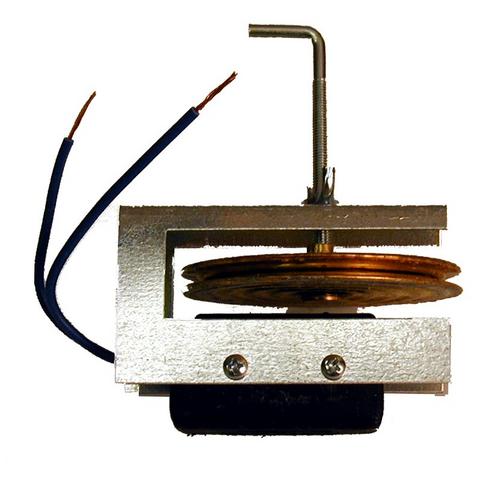
The Postmortem:
- The lightbulbs can actually put out enough heat to keep this cabinet at the right temp, they just have a pretty high duty cycle. Putting them in the top of the cabinet was a mistake, the temperature is always stratified (up to 15 degrees colder at the bottom)
- The fan is technically adequate, but the mounting is totally inadequate. Airflow is a turbulent mess and results in heat stratification.
- The egg turner works great, just don’t drop the motor on the concrete floor and still expect it to function. I think mine is alright, the cover popped loose and several of the reduction gears slipped out of place, but I got them all back in their places (I hope!)
- The mechanical wafer thermostat is TERRIBLE! Wild temperature swings, inconsistent cut-in and cut-out. I’m not one to throw useable parts away, but I’m thinking about it with this thermostat.
So here’s what I was up to in my garage this evening.
I present to you: Incubator v1.1
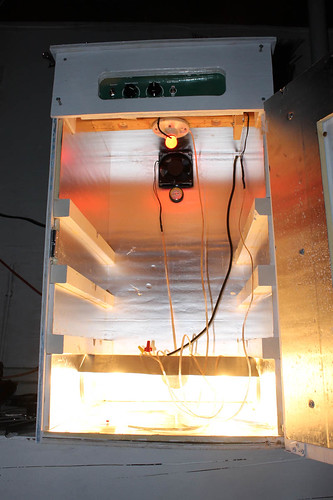
Yep, there are wires everywhere, and no thermostat yet. The new thermostat should be in Wednesday, but everything else is ready to go.
- The lights got moved to the bottom, and they got a nifty sheet-metal heat-shield to keep them from cooking the eggs directly above them.
- The fan was replaced with a 4″ 120v fan (no more 12v transformer) that sucks air out of the top and blows it down into the bottom through a 4″ vent hose. The new fan moves a little less air (65cfm) but it should be fine.
- I added a single socket at the top that currently holds a 7.5w red bulb to see by when the heat bulbs cycle off. I can also put a larger bulb into the top socket to keep the duty cycle lower for the main bulbs.
I fired it up tonight sans-thermostat and it went right up to 108 degrees and held steady there, with no noticeable heat stratification. In fact, there is a noticeable amount of airflow throughout the entire cabinet now.
I have been hatching eggs in an old electric frying pan!! I put a small towel on the bottom…a small container of water..out of 17 eggs 9 hatched…the ones that didn’t hatch…4 were NOT fertile and 4 did have dead chicks…always a mystery why the didn’t hatch.
I’m looking for more OLD f. pans as I’ve tried newer ones and the lowest temp I can get is 110.
I have one of those styrofoam incubators…out of 42 eggs 10 hatched…NOT happy…I’ve tried them many times before and the hatch rate is NOT good…
:o)….Colene
Nice! I never would have thought of using an electric skillet.